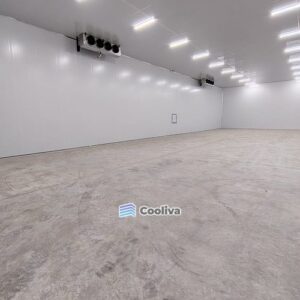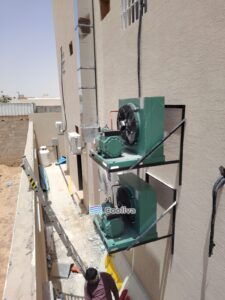

A cold room project moves through ten stages. It starts with a requirement discussion and a site review, continues through design, ordering, site preparation, installation and commissioning, then ends with handover and maintenance. The contractor leads most stages, but three things stay in your hands: clear requirements, quick approvals and a site that is ready on time.
Cold room project stages at a glance
| Stage | What the contractor does | What you do |
|---|---|---|
| 1. Requirement discussion | Asks about products, quantities and temperature | Share real figures |
| 2. Site review | Checks space, floor, access, power and drain | Give access to the building |
| 3. Design and quotation | Calculates the heat load and prices each item | Check layout and exclusions |
| 4. Approval and ordering | Orders panels, doors and equipment | Sign and freeze the scope |
| 5. Site preparation | Sends a readiness checklist | Prepare floor, power, drain and access |
| 6. Panels and doors | Assembles panels and fits the door | Keep the area clear |
| 7. Refrigeration and electrical | Installs units, piping and control panel | Have permanent power live |
| 8. Testing and commissioning | Runs leak and pull-down tests | Attend the test |
| 9. Handover and training | Trains staff and hands over documents | Check every document |
| 10. Support and maintenance | Services the system and repairs faults | Run daily checks |
Planning: stages 1 to 4
1. Requirement discussion
Expect questions about your products, the target temperature, the kilograms that arrive each day and how warm they are on arrival. Answer with real figures from a busy week. Confirm each product’s storage temperature with your supplier and the applicable SFDA requirements. If the dimensions are still open, read how to determine the right cold room size. Still comparing contractors? Use the checks in how to choose a cold room company.
2. Site review
A technician measures the space and the ceiling height. The visit also covers the floor, the route for carrying panels in, the position of the outdoor condensing unit, the nearest drain and the power supply. Saudi Arabia runs on 60 Hz and larger units need a three-phase supply. Bring the landlord or facility manager if the unit will sit on the roof.
3. Design and quotation
The contractor turns the data into a heat load calculation, a layout drawing and an itemised quotation. The design fixes the panel thickness, typically 80 to 100 mm for chiller rooms and 120 to 150 mm for freezer rooms. It also fixes the refrigeration capacity for Saudi summer heat, the door and the controls. Check the door position and your trolley or pallet routes on the drawing and ask what the price excludes. Our guide to the factors that drive cold room cost helps you compare offers.
4. Approval and ordering
You sign the layout drawing and the specification. The contractor then orders panels, doors and equipment and sends a schedule with a date for site readiness. Treat your signature as a freeze on the scope. A change of size or temperature after this point means new calculations, new orders and extra cost. Name one person on your side who signs documents.
On site: stages 5 to 8
5. Site preparation: your part
This stage belongs to you. The installers can only start on a ready site, so ask for a written checklist. It usually covers four areas:
- Floor: level, clean, dry and strong enough for loaded shelving or pallets. A freezer room needs an insulated floor. A large freezer on the ground needs frost heave protection under the slab.
- Power: a dedicated supply of the agreed voltage, phase and capacity at the agreed point.
- Drain: a drain point close to the room for defrost water.
- Access: an empty work area, a clear route for long panels, building or mall work permits and crane access for a rooftop unit.
6. Panel and door installation
The crew assembles the floor, wall and ceiling panels and seals every joint. Moisture that enters a panel turns to ice in a freezer and ruins the insulation. Then the door goes in, with a safety release on the inside. Freezer doors also get a frame heater and freezer rooms a heated pressure relief valve. Keep stock and other trades away. Do not let anyone drill the panels without asking the contractor.
7. Refrigeration and electrical installation
Technicians mount the evaporator inside the room and the condensing unit outside, in a spot with free airflow and space for service. They run the refrigerant pipes, lay the drain line and wire the control panel, probes, lights and alarms. Permanent power must be live at the agreed point by now. Without it, nobody can start or test the system.
8. Testing and commissioning
Technicians leak test the circuit, pull a vacuum and charge the refrigerant. After start-up they check pressures, defrost, alarms and door heaters. The main test is the pull-down: the empty room must reach its set temperature and hold it. Attend this test and ask for the readings in writing.
After start-up: stages 9 and 10
9. Handover and training
The contractor trains the people who use the room every day. Training covers the controller, the setpoint, the meaning of each alarm and who to call. It also covers loading rules: keep product off the walls and below the evaporator air stream. Sign the handover form after you receive the documents listed below.
10. Support and maintenance
Your staff check the display temperature, the door seal and any ice or water every day. A technician services the system monthly to quarterly and cleans the condenser coil more often after sandstorms. Agree the service plan before handover. Our cold room maintenance guide lists the tasks.
Documents to receive at handover
- As-built layout drawing and wiring diagram.
- Equipment list with brands, models and serial numbers.
- Commissioning record with pull-down results and pressures.
- Controller settings: setpoint, defrost schedule and alarm limits.
- Refrigerant type and quantity charged.
- Manufacturer manuals and data sheets.
- Warranty certificate with coverage, period and conditions.
- Maintenance schedule and service contact numbers.
Keep one set on site and one in your office.
What delays a cold room project
Three causes come up again and again:
- The site is not ready. The floor is unfinished or the space is still full of stock when the panels arrive.
- Power is not available. The room stands complete but nobody has connected the permanent supply, so commissioning waits.
- The scope changes after approval. A new size, a second door or a lower temperature sends the design back to stage 3.
Ask for a schedule that shows your tasks next to the contractor’s tasks.
Frequently asked questions about cold room projects
Can I keep my business open during installation?
Often, yes. Agree working hours, delivery times and the work area with the contractor during the site review. Raise mall or building rules early.
Can I change the room temperature after I approve the design?
A setpoint change within the design range is fine. Turning a chiller room into a freezer room is a different project. It needs thicker panels, an insulated floor, a heated door frame and a larger refrigeration system.
When can I load products after commissioning?
Load after the empty room reaches its set temperature and holds it. Start with product that is already cold and add stock in batches. Warm product beyond the design quantity keeps the temperature high for hours.
Start your project with Cooliva
From its base in Riyadh, Cooliva designs, supplies and installs cold rooms and freezer rooms for food, retail, logistics and industrial sites across Saudi Arabia. Its six-step process covers the same ground as this guide, from requirement discussion and site review to testing, handover and support. If you want one team to carry the whole job, look at our turnkey cold room projects. Send your site details through the contact page or call +966 59 799 1000.